 |
 |
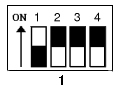
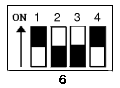
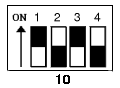
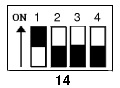
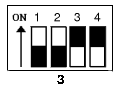
Support eleven 12 (or 10) bits
channels. |
|
Voltage range : 0 to 5V (or 0 to
10V). |
|
Conversion time : 500 us. |
|
Current consumption : 60 mA. |
|
Linearity error : 1 LSB. |
|
Power adapter : DC 9V, 500
mA. |
|
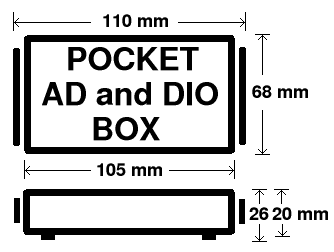
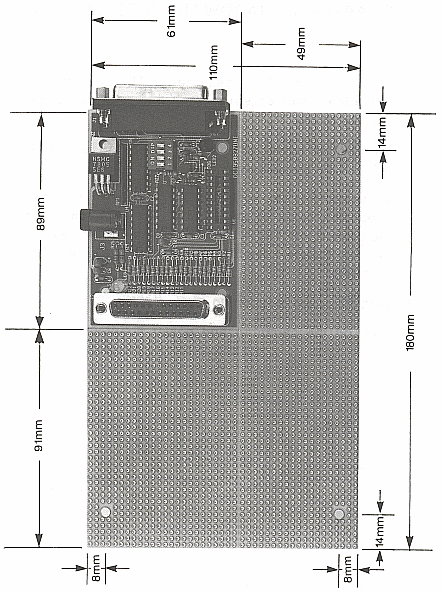
Pocket A/D box or pocket
A/D prototype board. |
|
Pocket A/D. |
|
Power adapter. |
|
User's manual. |
|
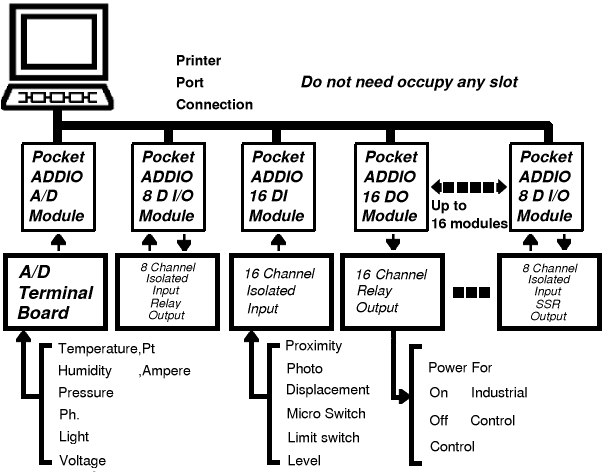
Expansion bus kit (optional). |
|
Pocket A/D terminal board
(optional). |
|
Pocket ADDIO COM module
(optional). |
| 1. |
Turn
off all power to your computer and all peripheral devices before
installing your pocket A/D. |
| 2. |
Connect
pocket A/D to printer port. (or connect expansion cable to printer port
and expansion bus kit, then insert pocket A/D to the connector of
expansion bus kit. Please see the expansion bus kit part of this
manual). |
| 3. |
Plug in power adapter
to pocket A/D. |
| 4. |
Turn on the computer
and power adapter. |
 |
 |
 |
 |
 |
 |
 |
 |
 |
 |
 |
 |
 |
 |
 |
 |
| Pin |
Function |
Pin |
Function |
| 1 |
GND |
14 |
+5V |
| 2 |
CH0 |
15 |
GND |
| 3 |
CH1 |
16 |
GND |
| 4 |
CH2 |
17 |
GND |
| 5 |
CH3 |
18 |
GND |
| 6 |
CH4 |
19 |
GND |
| 7 |
CH5 |
20 |
GND |
| 8 |
CH6 |
21 |
GND |
| 9 |
CH7 |
22 |
GND |
| 10 |
CH8 |
23 |
GND |
| 11 |
CH9 |
24 |
GND |
| 12 |
CH10 |
25 |
+5V |
| 13 |
GND |
| 1. |
Programming Guide |
|
| a. |
Initial |
|
|
void adinit(unsigned int
addr);
addr : printer port address. |
||
| b. |
Get A/D signal |
|
|
int getad(int box, int
channel);
box : identifier address.channel : A/D channel number. return : digital number. |
||
| c. |
Identify bits resolution |
|
|
Modify RESOLUTION
parameter, it will be 12 or 10.
|
||
| 2. |
Examples |
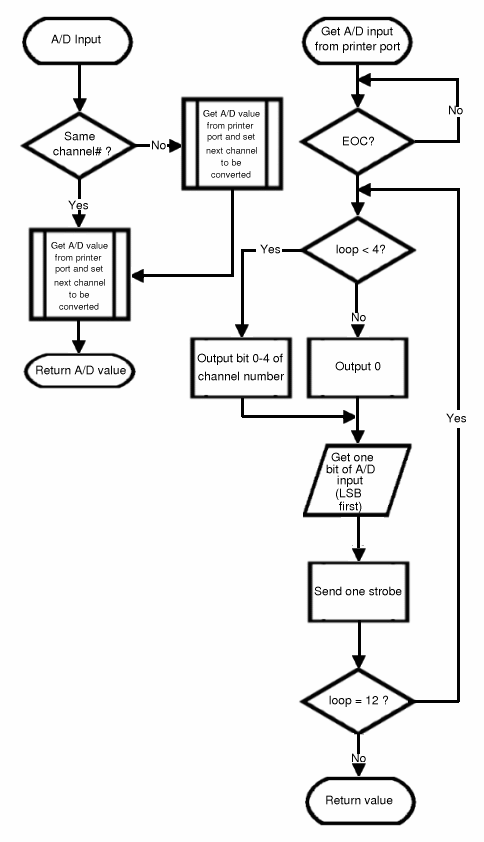
|
| On the next page, we show the flowchart to
introduce how to program the software. The examples of C, PASCAL,
BASIC, and ASSEMBLY are also shown in the following pages. |
||
| 1. |
IN
THE POCKET A/D PRODUCT, THERE ARE LABELS ON EACH CONNECTOR, PLEASE
FOLLOW THE DIRECTION OF LABEL NAME TO CONNECT THE CORRECT SIDE. |
| 2. |
FIRST
CONNECT THE POCKET A/D BOX, THEN SUPPLY THE POWER TO THE POCKET A/D BOX. |
|
WARNING
DO NOT SUPPLY THE POWER
FIRST, OTHERWISE IT WILL DAMAGE THE A/D CHIP.
|
|
IN THE SOURCE PROGRAM WHICH WE
PROVIDE IN THE MANUAL (SEE CHAPTER 4). YOU NEED TO PROVIDE MORE DELAY
IN UDELAY FUNCTION. (ALL UDELAY FUNCTION IN THE PROGRAM)
outport (DATA(port_addr),x|CLK);
udelay (1);
outport (DATA(port_addr),x|CLK);
udelay (5);
WARNING
IF YOU USE MORE THAN 1 METER, YOU NEED TO ADD MORE DELAY. | 1. |
PLEASE
READ THE FILES READ.ME AND *.DOC IN THE DISTRIBUTION DISKETTE BEFORE
YOU USE THE PACKAGE. ALL REVISED INFORMATION AND NEWS ARE STORED IN
THOSE FILES. |
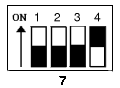
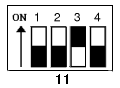
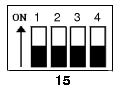
| 2. |
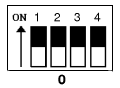
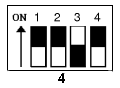
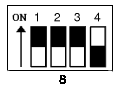
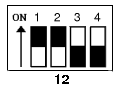
IT
PROVIDES MAXIMUM 16 POCKET A/D BOXES IN ONE SYSTEM WHEN YOU USE
EXPANSION BUS KIT. |
| 3. |
TO
USE EXPANSION BUS KIT TO DRIVE MORE POCKET A/D BOXES, PLEASE USE
SPECIAL POWER ADAPTER WHICH SUPPORTS 1000 mA. |